Python 编程必不可少的测试框架「pytest 篇」


.
测试是为了更高效的完成功能实现。
pytest 是基于 unittest 实现的第三方测试框架,比 unittest 更加的简洁、高效,并且可以完美兼容 unittest 的测试代码,无需对其做任何的修改。
pytest 的使用
使用 pip install pytest 可以直接安装 pytest 测试框架。
pytest 通过装饰器「@pytest.fixture」将函数设置为固件,以便于在测试开始前和测试开始后执行相应的操作。在函数中通过 yield 将同一个函数分为两部分,分别在测试前和测试后执行,避免遗漏资源的释放。
pytest 通过 conftest.py 文件进行数据共享,在其它文件中无需导入即可使用。并且 pytest 会自动识别 conftest.py 文件,无需显示指定。可以为子文件夹单独设置 conftest.py 文件。
在 Python 编程必不可少的测试框架「unittest 篇」 中讲述了 unittest 测试框架的使用,在这里我们将上一篇中的测试使用 pytest 重新实现,来观察 unittest 和 pytest 的区别。
我们将所有的公共函数「固件」放入 conftest.py 文件中,文件内容大致如下:
DEFAULT_USERNAME = 'test'
DEFAULT_PASSWORD = 'test'

@pytest.fixture
def app():
    db_fd, db_file = tempfile.mkstemp()
    app = create_app()
    app.config['SQLALCHEMY_DATABASE_URI'] = 'sqlite:///' + db_file

    print('pytest start')

    with app.app_context():
        db.drop_all()
        db.create_all()
        user = User.create(
            name=DEFAULT_USERNAME,
            password=DEFAULT_PASSWORD,
            permission=Permission.ADMINISTRATOR,
            active=True)

    yield app
    print('pytest stop')
    with app.app_context():
        db.session.remove()
        db.drop_all()
    os.close(db_fd)
    os.unlink(db_file)

@pytest.fixture
def clinet(app):
    return app.test_client()

@pytest.fixture
def headers(app, clinet):
    rv = clinet.post('/api/v01/user/login',
                        data=json.dumps(dict(user_name='test', password='test')),
                        content_type='application/json')
    data = json.loads(rv.data)
    token = data['token']
    headers = {"Authorization":"Bearer "+token, 'Content-Type': 'application/json'}

    yield headers

    pass
conftest.py 文件实现的内容实际上就是 unittest 中
setUp和setDown函数的内容。整体实现上更加的简单明了。
在测试文件中可以直接将使用装饰器 @pytest.fixture 标记的函数以同名参数的方法传入测试函数中,即可在测试函数中使用相应的功能。同样以 login 和 add_user 两个功能的测试为例,实现在 pytest 框架的测试实现:
def test_login(clinet):
    rv = clinet.post('/api/v01/user/login',
                    data=json.dumps(dict(user_name='test', password='test')),
                    content_type='application/json')
    data = json.loads(rv.data)

    assert rv.status_code == 200
    assert data['status'] == 1
    assert data['name'] == 'test'
    assert data['token'] is not None
    assert data['admin'] is not None
    assert data['expire'] is not None

def test_add_user(clinet, headers):

    rv = clinet.post('/api/v01/user',
                    data=json.dumps(dict(user_name='123', password='123', admin=False)),
                    headers=headers)
    data = json.loads(rv.data)
    assert rv.status_code == 200
    assert data['status'] == 1
在 pytest 中使用 assert 加表达式的方法来对结果进行验证,而在 unittest 中要通过 assertEqual、assertIn、assertTrue、assertFalse 等等来完成,要记忆的更多实现也更复杂。
使用 pytest 来运行测试实例,可以看到如下结果
================================================================================ test session starts ================================================================================
platform darwin -- Python 3.7.5, pytest-5.3.3, py-1.8.1, pluggy-0.13.1
rootdir: ***************
collected 4 items

tests/test_user.py ..                                                                                                                                                         [ 50%]
tests/unittest/test_user_unittest.py ..                                                                                                                                       [100%]
可以看到测试结果标记了测试进度,并且同步测试了 unittest 的测试用例。你可以通过 -s 参数来显示测试函数中的 print 输出内容。
如果你使用 -s 参数来 print 函数的输出的话,就会看到当前所有的固件「Fixture」在每个测试函数开始和完成时都会执行一次,这不是很浪费资源吗,是否可以每次测试运行只执行一次固件呢,答案是可以的,这就要用到固件的作用域了,通过装饰器 @pytest.fixture(scope='session') 来设置该固件的作用域是整个测试过程。更多内容请看文末的思维导图。
unittest 和 pytest 的比较
-
固件「Fixture」 在 unittest 中通过固定的函数 setUp 和 tearDown 来实现测试用例的前置和后置函数,并且是针对所有测试用例的。而在 pytest 中通过装饰器来设置固件的函数命名方式更加的灵活,并且可以将固件设置为函数级、类级、模块级、以及全局级。pytest 以 conftest.py 作为默认配置实现全局数据共享。
-
断言实现方式 在 unittest 中将每种判断方式单独实现了一个断言函数,比如 assertEqual、assertIn、assertTrue、assertFalse 等等,使用起来过于麻烦。在 pytest 中直接使用 assert + 表达式的方法来实现,更加清晰明了。
-
参数化 unittest 本身没有实现参数化的功能,pytest 可以通过装饰器
@pytest.mark.parametrize快速实现参数化。
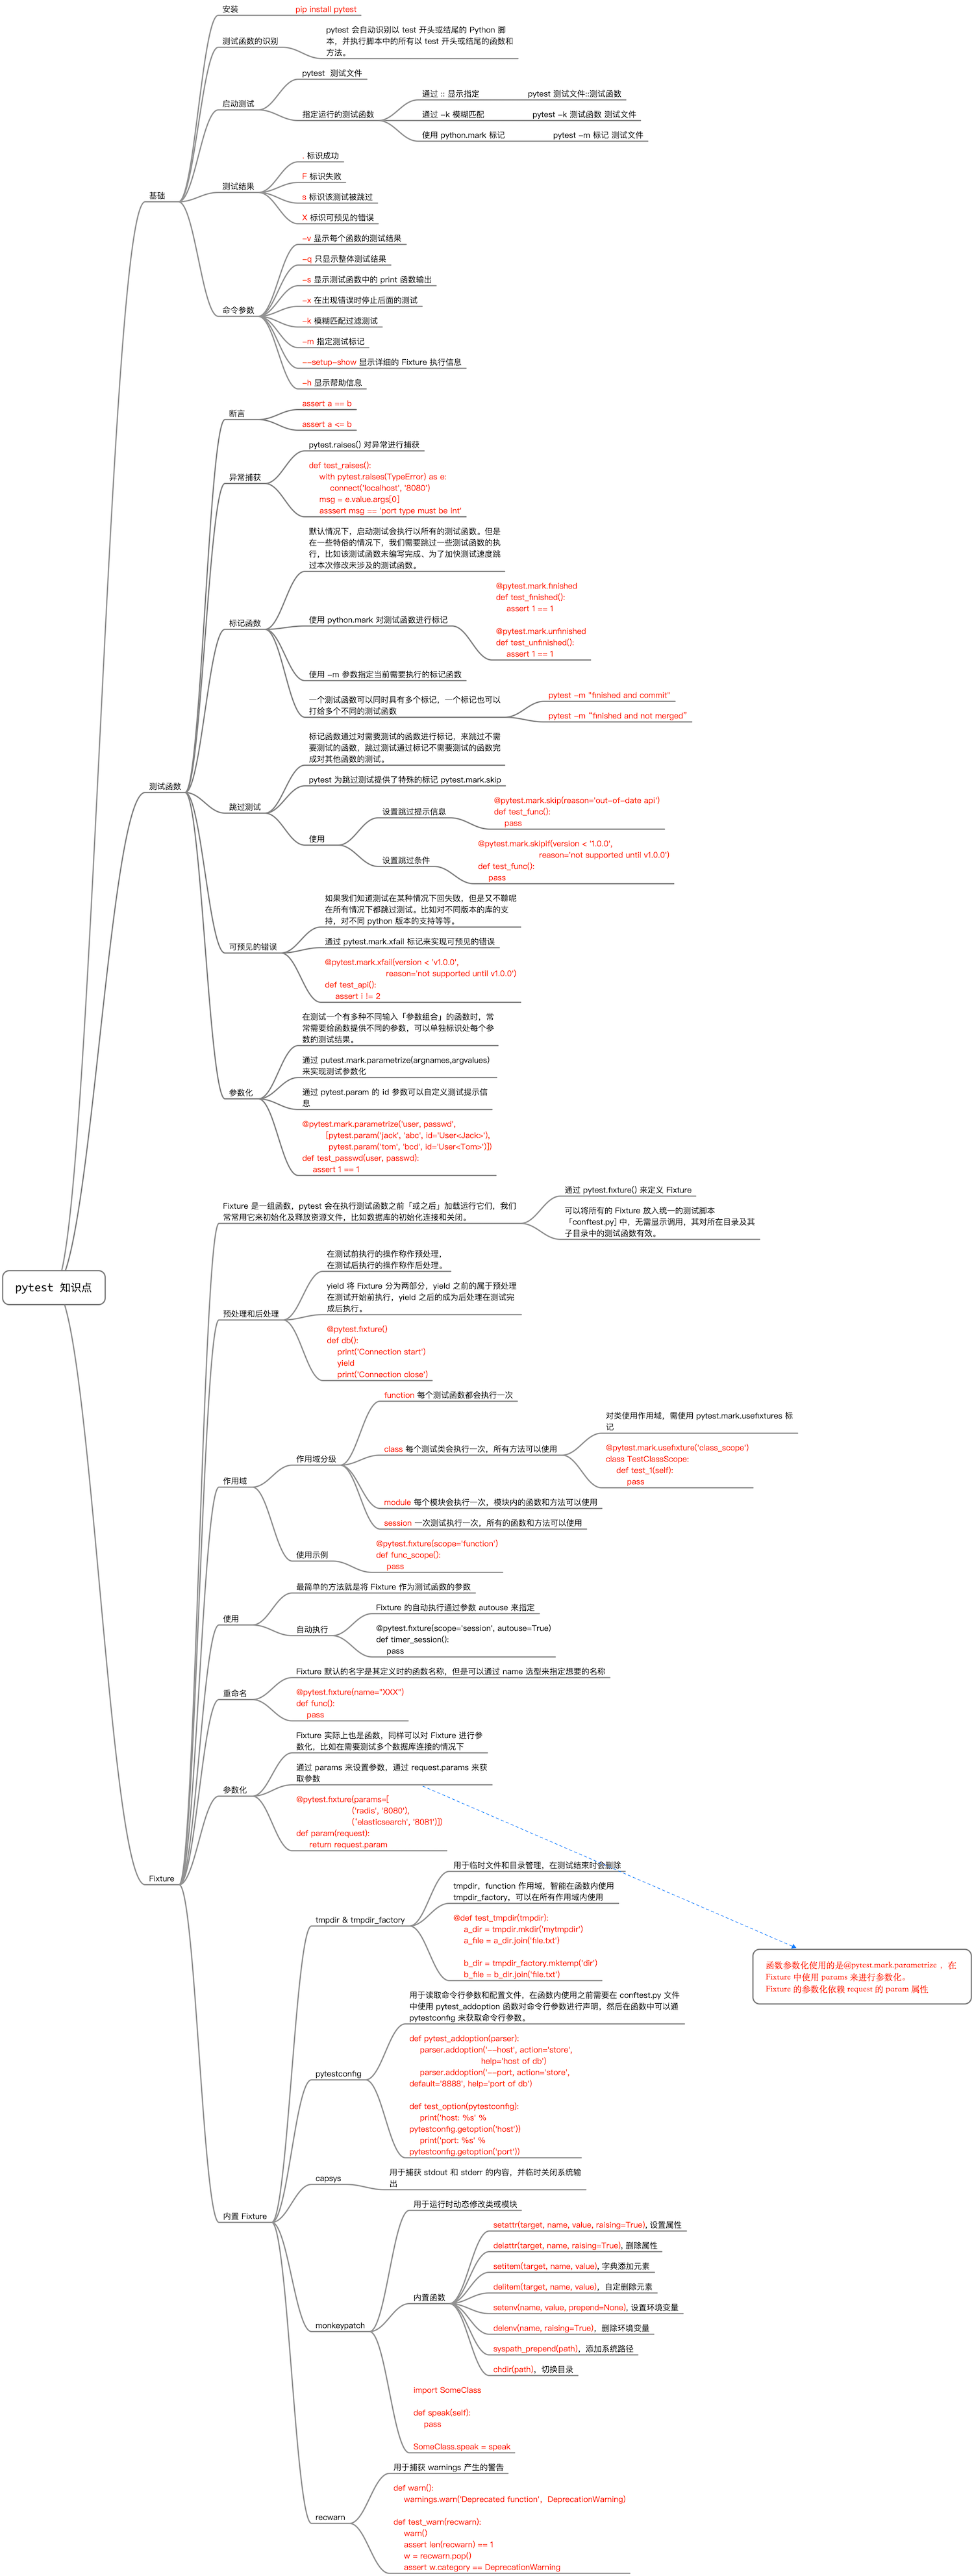
pytest 知识点的思维导图:
公众号回复 Flask 获取相关源码!
pip install pytest
pytest 使用 . 来表示测试成功,使用 F 来表示测试失败。
测试失败时会有详细的提示信息。
测试函数 断言: assert 异常捕获:pytest.raises with pytest.raises(TypeError) as e: connect(“localhost”, “1234”)
标记函数:用来对测试函数进行标记,在执行测试时选择相应的标记函数进行测试,可以跳过未被标记的函数。完成对测试函数的过滤。
@pytest.mark.unfinished @pytest.mark.finished
pytest -m “finished” 一个函数可以打多个标记,多个函数可以打同一个标记 pytest -m “finished and commit”
跳过测试: 使用 pytest.mrak.skip 标识 也可以使用以下标志来设置跳过的条件。 @pytest.mark.skipif(conn.version < ‘0.2.0’, reason=’not supported until v0.2.0’)
可预见的错误 @pytest.mark.xfail(gen.version < ‘0.2.0’, reason=’not supported until v0.2.0’)
参数化
当测试一个有多种不同输入的函数时,通常需要给函数传入多组不同的输入,面对这种情况,我们经常在测试函数中设置一个参数数组,然后在测试函数内部进行遍历,这种方法虽然可以完成测试过程,但是当一个测试参数出现错误时,整个测试就会被停止。pytest 提供了参数化测试来解决这个问题,pytest.mark.parametrize(argnames, argvalues)
@pytest.mark.parametrize('user, passwd',
                         [pytest.param('jack', 'abcdefgh', id='User<Jack>'),
                          pytest.param('tom', 'a123456a', id='User<Tom>')])
def test_passwd_md5_id(user, passwd):
    db = {
        'jack': 'e8dc4081b13434b45189a720b77b6818',
        'tom': '1702a132e769a623c1adb78353fc9503'
    }

    import hashlib

    assert hashlib.md5(passwd.encode()).hexdigest() == db[user]
ptytest.param 的 id 参数可以使每组测试默认参数的显示更加清晰易辨认。
Fixture
在测试开始前往往需要进行一些特殊的设置,比如数据库的连接、用户登录 Token 的获取等等。同样在测试完成后需要对测试过程中使用到的数据进行清理。此时我们就要用到 pytest 的 Fixture 特性。
Pytest 使用 yield 关键字将 Fixture 分为两部分,yield 之前的代码属于预处理,会在测试前执行,yield 之后的代码属于后处理,会在测试完成周执行。
一个简单的示例如下:
@pytest.fixture()
def db():
    print('Connection successful')
    yield
    print('Connection closed')

def search_user(user_id):
    d = {
        '001': 'xiaoming'
    }
    return d[user_id]

def test_search(db):
    assert search_user('001') == 'xiaoming'
作用域
在定义固件时,通过 scope 参数声明作用域,可选项有:
- function: 函数级,每个测试函数都会执行一次固件;
- class: 类级别,每个测试类执行一次,所有方法都可以使用;
- module: 模块级,每个模块执行一次,模块内函数和方法都可使用;
- session: 会话级,一次测试只执行一次,所有被找到的函数和方法都可用。
def func_scope():
    pass

@pytest.fixture(scope='module')
def mod_scope():
    pass

@pytest.fixture(scope='session')
def sess_scope():
    pass

@pytest.fixture(scope='class')
def class_scope():
    pass
自动执行 通过 autouse 参数来执行,比如说定义一行函数来计算每个测试所使用的时间,或者定义一个函数来计算测试总共所花费的时间。
固件的参数化
固件参数化,需要使用内置固件 request,并通过 request.param 获取参数。
@pytest.fixture(params=[
    ('redis', '6379'),
    ('elasticsearch', '9200')
])
def param(request):
    return request.param

@pytest.fixture(autouse=True)
def db(param):
    print('\nSucceed to connect %s:%s' % param)

    yield

    print('\nSucceed to close %s:%s' % param)

def test_api():
    assert 1 == 1
Explore more like this


python 反射
在计算机学中,反射(英语:reflection)是指计算机程序在运行时(runtime)可以访问、检测和修改它本身状态或行为的一种能力。[1]用比喻来说,反射就是程序在运行的时候能够“观察”并且修改自己的行为。
Comments